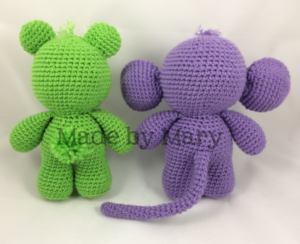
This week I am participating in the Crochet Toy Drive. I have a new pattern to share with you and it will be free here on my website! If you would like the pdf version, you can pick that up in Ravelry for $1. That version has a bunch of progress pictures.
 Abbreviations
- ch – chain
- st(s) – stitch(es)
- sc – single crochet
- hdc – half double crochet
- dc – double crochet
- inc – increase (sc 2 times in the next stitch)
- dec – decrease (stitch next 2 stitches together)
- hdc dec – half double crochet decrease (hdc the next 2 sts together)
- hdc inc – half double crochet increase (hdc 2 times in the next stitch)
- 3sc – 3 sc in next st
- sl st – slip stitch
- sk – skip chain or stitch
- sp – space
- BLO – back loop only
- FLO – front loop only
- R – round
- [ ] – repeat work as directed
- ( ) – number of sts you should have at the end of the round
- FO – finish off
- MR – magic ring
Before you begin
- This amigurumi/plush is worked in continuous rounds. Mark the beginning of each round with a stitch marker.
- Use the “magic ring” when starting rounds. There are many youtube videos teaching how to make a magic ring or magic circle.
- Gauge is not important in this project as long as you are consistent with your tension.
- TIP: Always change colors in the stitch BEFORE the color change by pulling the new color through the 2 loops, thus beginning with the correct color on your hook.
- Exact colors used are listed in italics in the “Supplies” section. Some photos will not be the correct color.
- This project is made with all sc stitches unless otherwise specified.
Supplies
- Worsted Weight [4] in colors listed below
- Main Color (Body) Hobby Lobby I Love This Yarn: Amethyst [150 yds]
Red Heart: Spring Green - Light Color (Belly, Toes, Snout) Caron One Pound: Lilac [15 yds]
Impeccable: Soft Fern - Dark Color (Nose) [scrap]
- White Felt
- 2 – 15mm plastic safety eyes
- Crochet hook size F/5 (3.75mm)
- Yarn needle
- Stitch markers
- Fiberfill or stuffing of choice
Arm – make 2
With Main Color
R1: MR sc 6R2: inc x6 (12)
R3: [inc, sc 1] x6 (18)
R4-8: sc 18
R9: [dec, sc 7] x2 (16)
R10: [dec, sc 6] x2 (14)
R11: [dec, sc 5] x2 (12)
R12-14: sc 12
Stuff. Don’t stuff much at the top of the arm.
Flatten, sc 5 through both layers. (5)
FO, hide end.
Foot – make 2
With Light Color
R1: MR sc 6
R2: inc x6 (12)
Change to Main Color.
R3: [inc, sc 1] x6 (18)
R4: [inc, sc 2] x6 (24)
R5: BLO sc 24
R6-8: sc 24
R9: [dec, sc 6] x3 (21)
R10: [dec, sc 5] x3 (18)
R11-12: sc 18
FO, hide end. Stuff.
Body
With Main Color
R1: Pick up both legs, insert hook in middle stitches and sc legs together, sc in next stitch also, joining them well in the middle (2). The joining 2 sc’s will not count in your stitch count. The next stitch you make will be in the leg on your left and this will be the beginning stitch so place your stitch marker here. Continue around left leg and then go around right leg. You want to be working from the back. (32)
R2: [inc, sc 7] x4 (36)
R3: [inc, sc 8] x4 (40)
R4-8: sc 40
R9: [dec, sc 8] x4 (36)
R10: [dec, sc 7] x4 (32)
R11: sc 3, [dec, sc 6] x3, dec, sc 3 (28)
R12: [dec, sc 5] x4 (24)
R13: sc 5, place arm next to body. Sc 5 through arm and body. Sc 7, place remaining arm next to body. Sc 5 through arm and body, sc 2 (24)
R14: BLO [dec, sc 2] x6 (18)
R15: [dec, sc 1] x6 (12)
Stuff.
R16: dec x6 (6)
FO, leave 8” end. Use end to sew hole. Hide end.
Head
With Main Color
Join yarn to 1st st in front loops left over from working in back loops on R14.
R1: sc 24
R2: [inc, sc 3] x6 (30)
R3: sc 2, [inc, sc 4] x5, inc, sc 2 (36)
R4: [inc, sc 5] x6 (42)
R5: sc 3, [inc, sc 6] x5, inc, sc 3 (48)
R6: sc 19, inc x3, sc 14, inc x3, sc 9 (54)
R7-11: sc 54
R12: sc 20, dec x3, sc 14, dec x3, sc 8 (48)
R13: sc 48
R14: [dec, sc 6] x6 (42)
R15-17: sc 42
R18: [dec, sc 5] x6 (36)
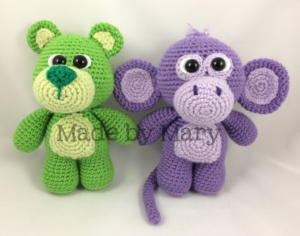
If making bear, cut circles of felt about the size of a penny. Insert 15mm eyes into felt and into head between R13-14, 2 sts apart. If making monkey eyes are in next step.
R19: sc 2, [dec, sc 4] x5, dec, sc 2 (30)
R20: [dec, sc 3] x6 (24)
R21: [dec, sc 2] x6 (18)
Stuff.
R22: [dec, sc 1] x6 (12)
R23: dec x6 (6)
FO, leave 8” end. Use end to sew hole. Hide end.
Belly
With Light Color
R1: MR sc 6
R2: inc x6 (12)
R3: [inc, sc 1] x6 (18)
R4: [inc, sc 2] x6 (24)
R5: inc, sc 7, in next st: (hdc, dc, hdc), sc 6, in next st: (hdc, dc, hdc), sc 7, inc (30)
FO, leave 18” end. Use end to sew to belly with beginning of MR at neck area.
Monkey Eye – make 2
With Light Color
R1: MR sc 6 Do not tighten ring.
R2: inc sc x2, inc hdc x2, inc sc x2 (12)
FO, leave 12” end.
Cut circles of felt about the size of a penny. Insert 15mm eyes into felt. Insert into center of MR.
Use end to sew eyes to head with safety eyes between R13-14 and crochet eye part touching.
Muzzle
With Light Color
R1: MR sc 6
R2: inc x6 (12)
R3: [sc 3, inc 3] x2 (18)
R4: sc 3, [inc, sc 1] x3, sc 3, [inc, sc 1] x3 (24)
R5: sc 3, [inc, sc 2] x3, sc 3, [inc, sc 2] x3 (30)
R6-9: sc 30
R10: [dec, sc 3] x6 (24)
FO, leave 18” end. Stuff. Use end to sew muzzle to face just below eyes.
Use dark color to stitch nose holes.
Monkey Ear – make 2
With Main Color
R1: MR sc 6
R2: inc x6 (12)
R3: [inc, sc 1] x6 (18)
R4: [inc, sc 2] x6 (24)
R5: [inc, sc 3] x6 (30)
R6-11: sc 30
R12: [dec, sc 3] x6 (24)
R13: sc 24
R14: [dec, sc 2] x6 (18)
FO, leave 12” end. Set aside.
Monkey Inner Ear – make 2
With Light Color
R1: MR sc 6
R2: inc x6 (12)
R3: [inc, sc 1] x6 (18)
R4: [inc, sc 2] x6 (24)
FO, leave 12” end. Sew Inner Ear to Ear.
Sew Ear to head at R13-17 counting down from top of head.
Monkey Tail
With Main Color
R1: MR sc 6
R2-30: sc 6
FO, leave 6” end. Use end to sew to back.
Bear Nose
With Dark Color
R1: MR sc 6
R2: inc, in next st: (dc, hdc), sl st 2, in next st: (hdc, dc), inc (10)
FO, leave 12” end. Use end to stitch to Muzzle.
Bear Ear – make 2
With Main Color
R1: MR sc 6
R2: inc x6 (12)
R3: [inc, sc 1] x6 (18)
R4-6: sc 18
R7: [dec, sc 1] x6 (12)
FO, leave 12” end. Set aside.
Bear Inner Ear – make 2
With Light Color
R1: MR sc 4, do not join
R2: ch 1, turn, inc x4 (8)
FO, leave 12” end. Sew Inner Ear to Ear.
Sew Ear to head at R4-8 counting down from top of head.
Bear Tail
With Main Color
Make a pom pom and sew it on.
Insert 3” piece of main color, in top of head and split ends to create hair.
Copyright Info
Thank you for purchasing my pattern! I worked very hard on designing and writing this, so please do not copy, alter, share or upload this pattern anywhere. Please contact me if you have obtained this pattern anywhere other than directly from me. You have worked hard on your finished item and may use pieces made with this pattern for non-commercial and commercial purposes. Commercial permission includes online handmade communities/shops, local craft fairs, etc. Commercial permission does not include mass market or factory production of any kind. Please do not claim this pattern, design, or the pictures in it as your own. The only thing I ask is a clear designer credit to Mary Smith or Made by Mary and a link back to my Ravelry shop.